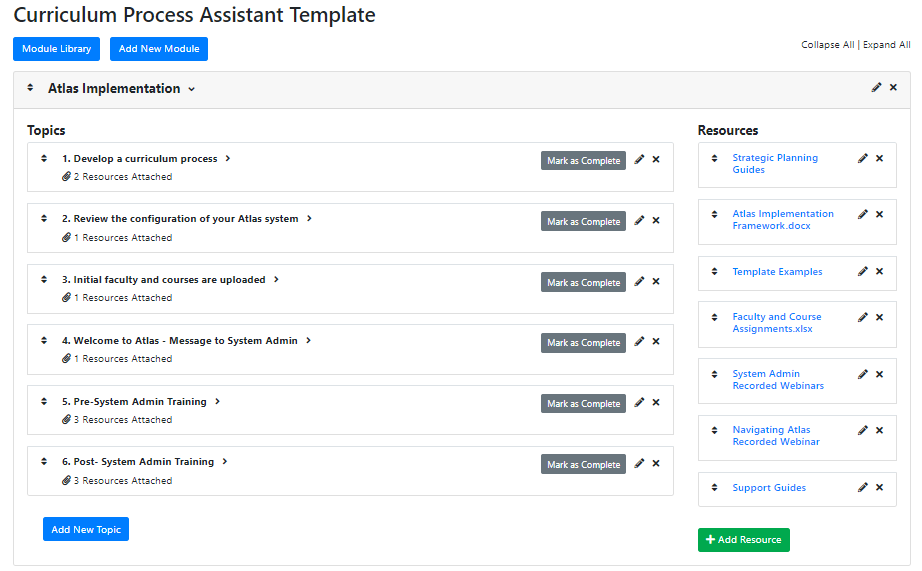
The Curriculum Process Assistant (CPA) is a tracking tool that schools can use to streamline their curriculum process. Admins create a list of Modules to complete, set-up a communication plan within each, and add deadlines to help organize the process of learning and using Atlas.
Application
Modules
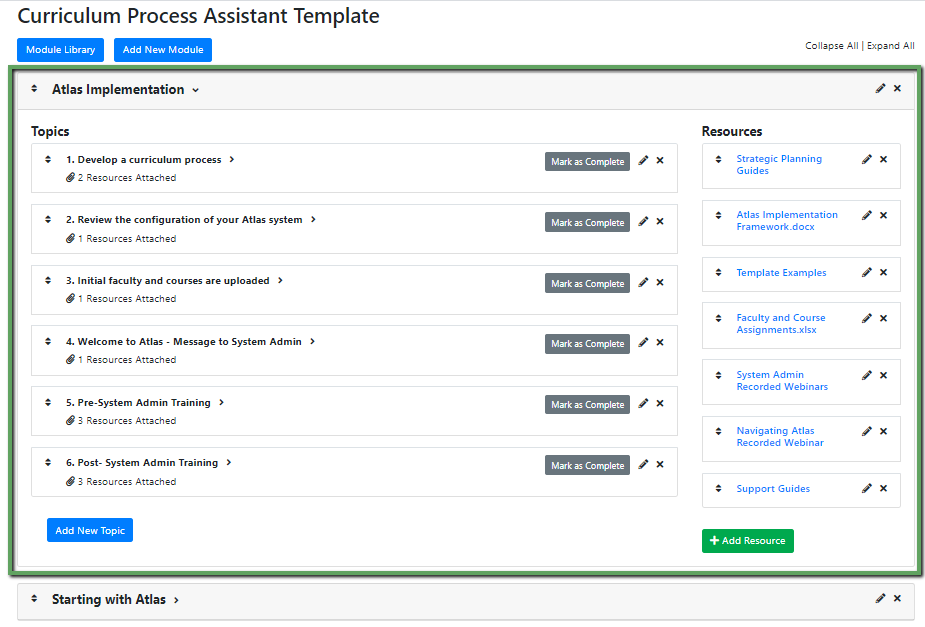
A Module is a grouping of Topics and Resources you want your team to cover as they are learning a certain process. Take a look at these guides to learn more about what you can do with Modules in the system.
Copy from a Module Library
From Admin Dashboard > Curriculum Process Assistant
- Click the “Module Library” button at the top of your page.
- Select the desired Module(s) by checking/unchecking the check boxes. Click the Module Name to expand the details of the module.
- Click the “Copy” button to copy the selected Modules, or click the “Back to Curriculum Process Assistant Page” link to cancel the copy.
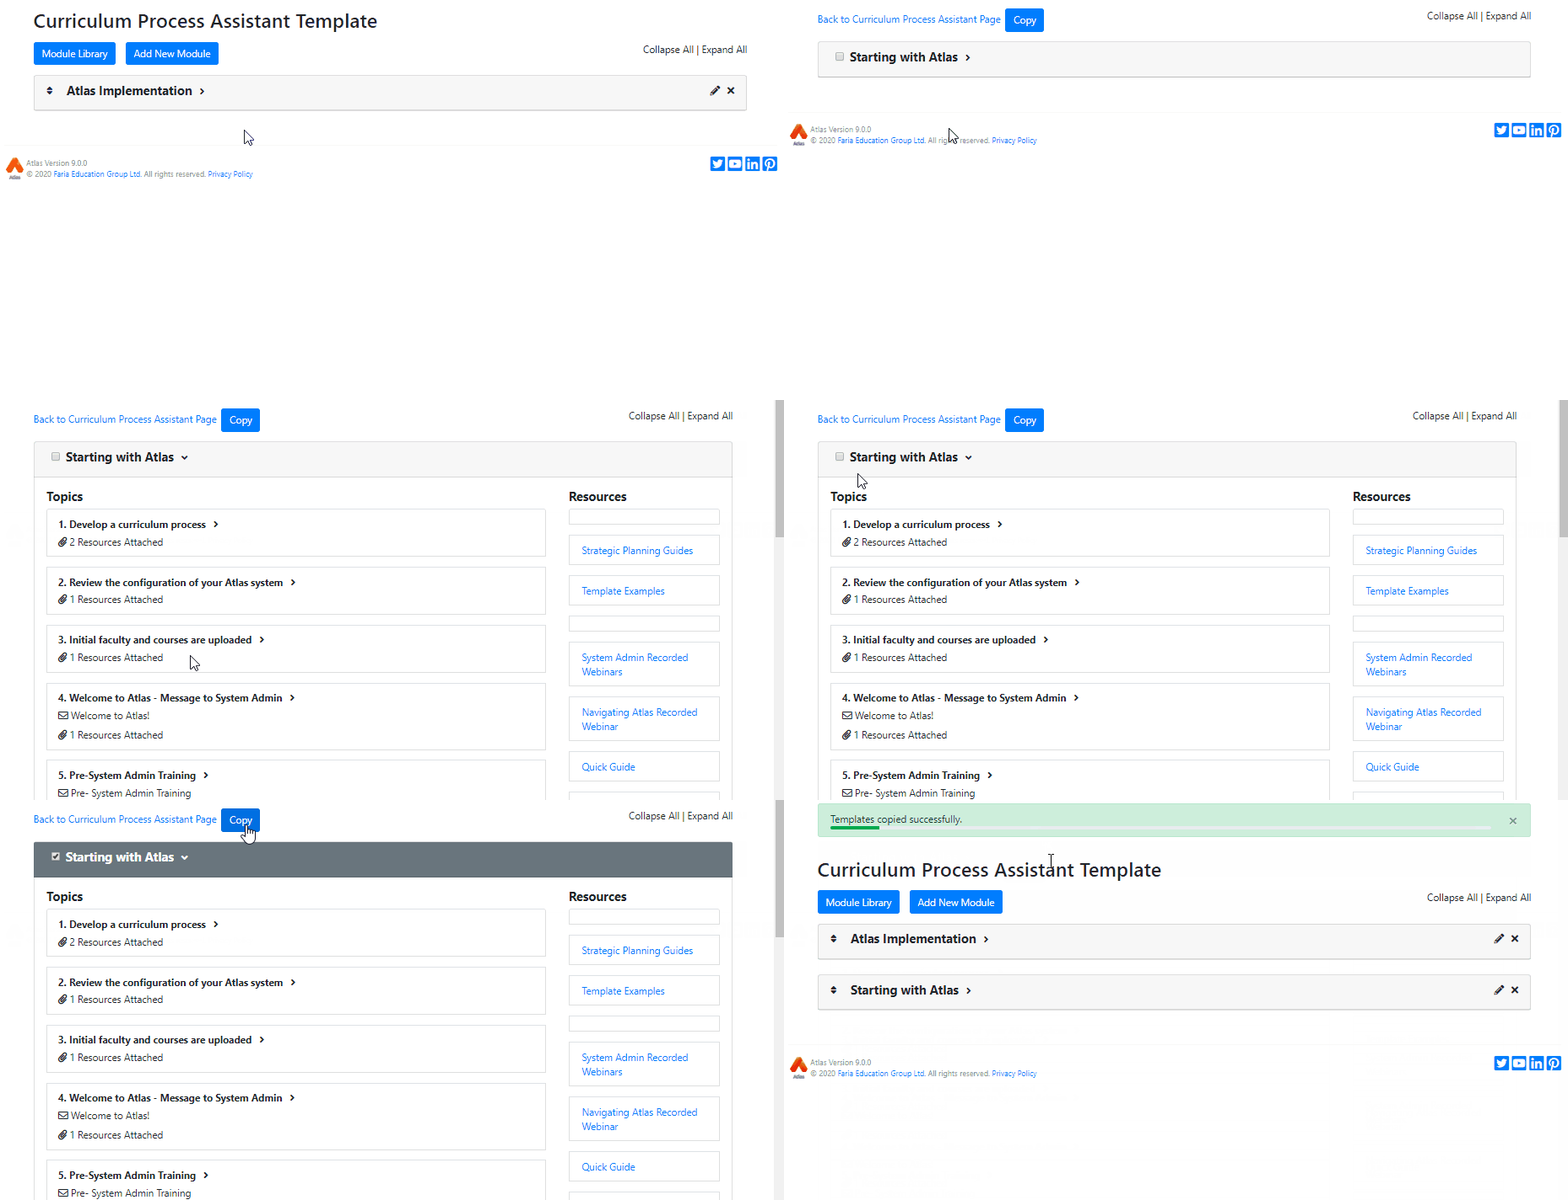
1) Copied Modules are separate from the original, changes in the copies won't affect the original version. 2) When a Module is copied over from the Module Library, all the Topics and Resources associated with the Module will be copied over as well.
Create a New Module
From Admin Dashboard > Curriculum Process Assistant
- Click the “Add New Module” button at the top of your page.
- Required: enter a Module Name.
- Click the “Save” button to save, or click the “Cancel” button to cancel.
Edit/Rename a Module
From Admin Dashboard > Curriculum Process Assistant
- Click the pencil icon to rename a Module.
- Click the “Save” button to save, or click the “Cancel” button to cancel.
Delete a Module
From Admin Dashboard > Curriculum Process Assistant
- Click the X icon to delete a Module.
- A warning message will pop-up, click the “OK” button to proceed, or click the “Cancel” button to cancel.
If a module is deleted, all the associated topics and resources will be permanently deleted as well.
Sort the Modules
From Admin Dashboard > Curriculum Process Assistant
- Drag and drop the sort icon on the left to sort the Module manually.
By default, the newly created Module goes to the bottom of the list.
Expand and Collapse
From Admin Dashboard > Curriculum Process Assistant
- Click the Module Name to expand or collapse the Module.
- Click the “Expand All” or the “Collapse All” link on the upper right-hand corner to expand or collapse all Modules on the page.
Topics
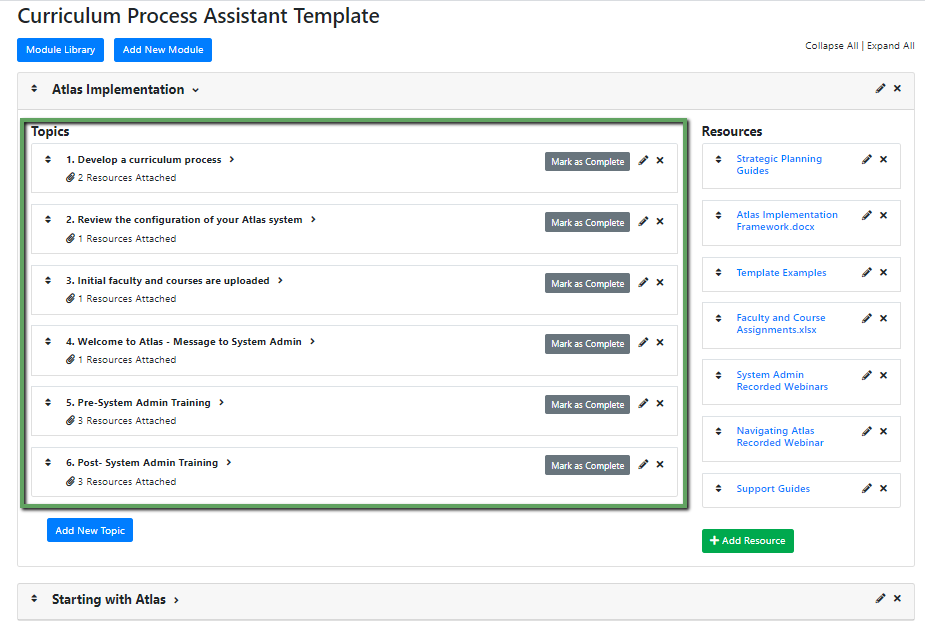
A Topic is one item or task that needs to be completed within a Module. When a Module is copied over from the Module Library, all the Topics and Resources associated with the Module will be copied over as well, as a draft to start from. They can be edited and customized to meet your needs.
Create a Topic
From Admin Dashboard > Curriculum Process Assistant
- Click the “Add New Topic” button at the bottom of the Topics list.
- Required: enter a Topic Name.
- Optional: Enter the details into Details.
- Optional: Click the “Create School Message” button. This message will be sent to selected recipients either immediately or on a scheduled date and time (see more information about the School Message section below).
- Drag and drop any resources that are associated with this Module into this Topic from the right-hand list, or add new by clicking Add Resource.
Edit/Rename a Topic
From Admin Dashboard > Curriculum Process Assistant
- Click the pencil icon to rename a Topic.
- Click the “Save” button to save, or click the “Cancel” button to cancel.
Delete a Topic
From Admin Dashboard > Curriculum Process Assistant
- Click the X icon to delete a Topic.
- A warning message will pop out, click the “OK” button to proceed, or click the “Cancel” button to cancel.
Mark a Topic as Complete
From Admin Dashboard > Curriculum Process Assistant
- Click the “Mark as Complete” button in the upper right-hand corner of the Topic when a Topic has been completed.
- If a School Message is scheduled to send but has not been sent yet, the Topic can't be marked as completed until the message is sent. When the School Message is sent, the Topic that this School Message is associated with will be marked as “Completed” automatically.
- To reopen a completed Topic, click the pencil icon, make changes to the Topic, and then click the “Save” button to reopen, or click the “Cancel” button to cancel.
Sort the Topics
From Admin Dashboard > Curriculum Process Assistant
- Drag and drop the sort icon on the left to sort the topics manually.
By default, the newly created Topic goes to the bottom of the list.
Expand and Collapse
From Admin Dashboard > Curriculum Process Assistant
- Click the Topic Name to expand or collapse the Topic.
Resources
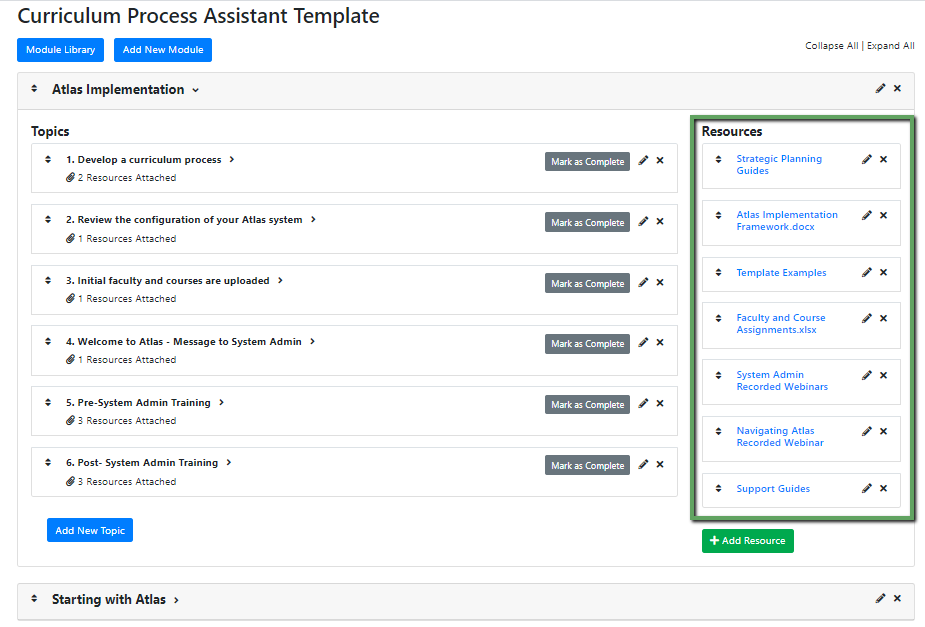
A Resource is any file or link that is attached to a Topic for review or use as your team is completing the item in the Topic. When a Module is copied over from the Module Library, all the Resources associated with the Module will be copied over as well and you can customize them to your needs from there.
Add a Resource
From Admin Dashboard > Curriculum Process Assistant
- Click the “Add Resource” button at the bottom of the Resources list.
- Click the “Website Link” button, and enter a Website URL (required field) and a Description (optional).
- Or, click the "File Attachment" button, and select a file from your device, then click the “Save” button. Click the pencil icon of the newly created File Attachment to add a Description.
- You can also drag and drop a document(s) from your computer to the “Add Resource” area.
Each file has to be 100M or smaller.
Edit/Rename a Resource
From Admin Dashboard > Curriculum Process Assistant
- Click the pencil icon to rename a Resource.
- Click the “Save” button to save, or click the “Cancel” button to cancel.
Delete a Resource
From Admin Dashboard > Curriculum Process Assistant
- Click the X icon to delete a Resource.
- A warning message will pop out, click the “OK” button to proceed, or click the “Cancel” button to cancel.
Sort the Resources
From Admin Dashboard > Curriculum Process Assistant
- Drag and drop the sort icon on the left to sort the Resources manually.
By default, the newly created Resource goes to the bottom of the list.
Attach a Resource to a Topic
From Admin Dashboard > Curriculum Process Assistant
- Drag and drop a Resource to a Topic. When a Resource is dragged from the Module Resource list and dropped over the "Add a Resource" button in the Topic, it will become independent (a copy of the original) which means changing it from one place wouldn’t affect the other.
- Click the X icon next to any Resource to remove it from this Topic (the Resource will remain in the Resource List, although deleted from the Topic).
School Message
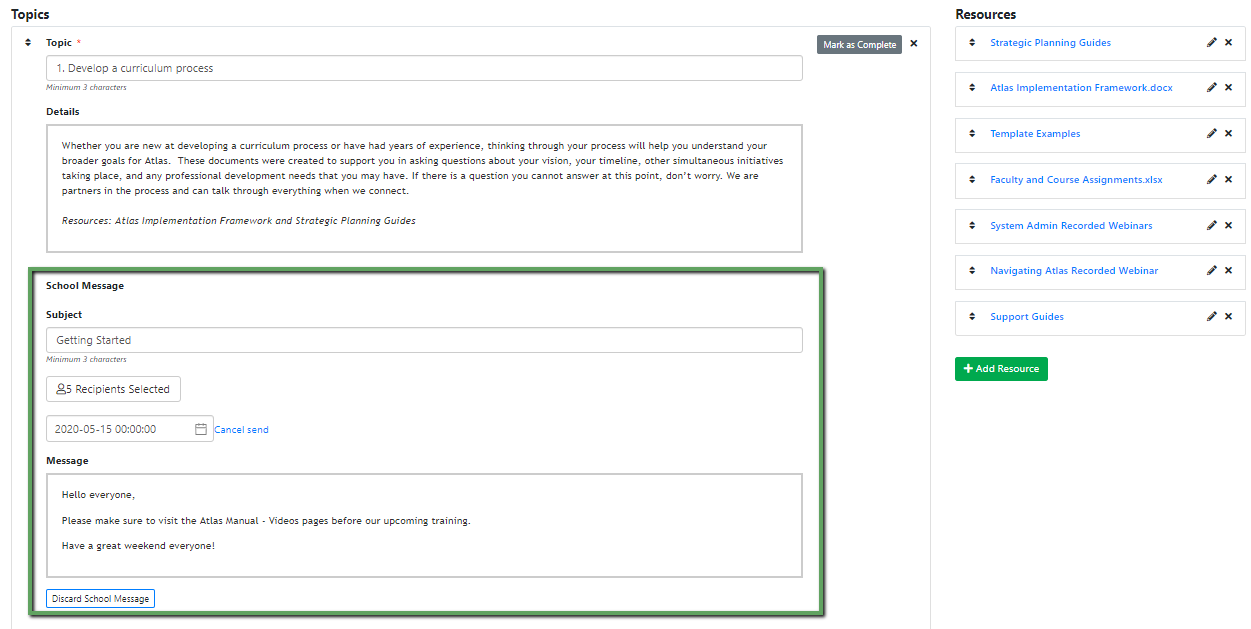
In each Topic, users can create a School Message (or edit the Template Message copied from the Module Library along with the Module/Topic), then send it to a selected group of recipients, either immediately or on a future date and time.
Create a School Message
From Admin Dashboard > Curriculum Process Assistant
- Click the pencil icon "Edit" of the desired Topic, then click the “Create School Message” button.
- Enter a message Subject.
- Click the “Select Recipients” button to select recipients using the filters in the modal window. A School Message cannot be sent or be scheduled to send if no Recipients are selected.
- Click the calendar icon to schedule a date and time of sending the message. Click the “Cancel send” link to cancel a scheduled send.
- Enter detailed message information into the Message box.
- Click "Save" and the Topic with the scheduled School Message will be saved. The School Message will be sent on the specified date and time. Once sent, the Topic will be marked as "Completed" automatically.
WARNING: All Resources associated with this Topic will be sent along with the message as attachments.
Edit a School Message
From Admin Dashboard > Curriculum Process Assistant
- Click the pencil icon next to the Topic to make changes to the School Message.
Delete a School Message
From Admin Dashboard > Curriculum Process Assistant
- Click the pencil icon "Edit" of the desired Topic, then click the “Discard School Message” button.
- A warning message will appear, click the “OK” button to proceed, or click the “Cancel” button to cancel.